Sunday 29 November 2015

Курица по-мароккански с лимоном и оливками.

Повторение пройденного!
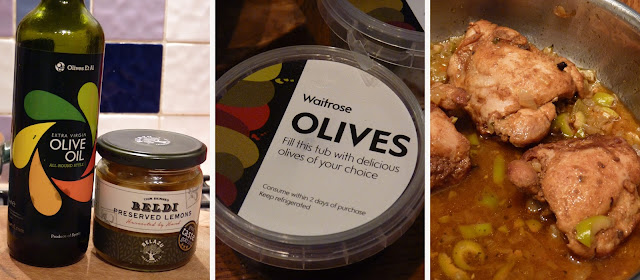
Вам нужно скомпоновать так называемую Марокканскую смесь:
2 чайные ложки паприки
1 чайная ложка молотого тмина
1 чайная ложка молотого имбиря
1 чайная ложка куркумы
Корица 1/2 ч.л
1/4 чайной ложки свежемолотого перца

Положить 6-8 кусочков курицы (я люблю без шкуры) в полиэтиленовый пищевой пакет и натереть в нем кусочки этой смесью - это легко и руки чистые!
Оставить мариноваться от часа до…на ночь в холодильнике.

Затем как следует поджарить на хорошо раскаленной сковороде с антипригарным покрытием в нескольких ложках оливкового масла до золотистого цвета (я добавляю чуть сливочного)!
Переложить кусочки курицы в “Козероль”/Жаровню/Dutch oven.

А в той сковороде, в которой жарили кусочки, поджарьте в течение примерно 10 минут:
1 нарезанную луковичку +
3 зубчика чеснока (измельченных) +
1-2 консервированных лимона (у нас продают в баночках)
100г оливок (любого цвета)

Залейте по готовности эту смесь куриным бульоном - 200 мл, дайте прокипеть.
Затем всю эту душистую смесь - на курочку в жаровне.
Солить мне не пришлось - оливки были солеными.

Закройте крышкой жаровню, дайте закипеть и поставвьте в предварительно разогретую до 180С духовку на 45 минут мах!
Посыпать свежей петрушкой и кориандром и на стол …с Кус-кус (сouscous)!
Вкуснота!

Moroccan Chicken with Lemon & Olives.

Moroccan Chicken with Lemon & Olives · Olives Et Al:

1.5 – 2kg Chicken cut into 8 pieces
Moroccan Chicken Spice Mix – see below
50ml Olives Et Al Extra Virgin Olive Oil
3 Cloves Garlic crushed
1 Onion chopped
1 or 2 Olives Et Al Preserved Lemons
100g Olives Et Al Green or Mixed Pitted Olives – roughly chopped
200ml Chicken Stock
Fresh Coriander chopped
Fresh Parsley chopped

Wash and dry the Chicken pieces and toss into a bowl with the spice mixture – make sure all the pieces are well covered.
Ideally, transfer to a plastic bag and leave at least 1 hour or overnight in the fridge massaging them every now and again to really make sure they’re covered.

Use a clay tagine if you have one but it really isn’t essential – a decent casserole dish with a lid and suitable for placing on the hob is fine.
If you don’t have one or are worried then fine – just use a frying pan for the first bit then transfer to a casserole for the oven bit.

Heat some oil in the casserole dish and seal the chicken pieces for 4-5 minutes turning until lightly browned.
Add the garlic, onions, preserved lemon, olives and cook through for 10 minutes or so.

Add the chicken stock, stir gently, cover and transfer to the oven at 130 - 140C for slow cooking and leave for 3 or 4 hours or, if you want it quick then do at 180C for an hour.
Either way, make sure the chicken is completely cooked through.

Mix in fresh coriander and parsley right before serving.
Adjust seasonings to taste.
Serve with couscous.

Moroccan tagine spice mix:
2 tsp Paprika
1 tsp Ground Cumin
1 tsp Ground Ginger
1 tsp Turmeric
1/2 tsp Cinnamon
1/4 tsp Freshly Ground Pepper

OR:
- Moroccan Chicken Tagine | Williams-Sonoma Taste
'via Blog this': 11 Nov 2013.

Olives Et Al recipe.

- Cous Cous and Red Rice Salad · Olives Et Al
- Parsnip and Chilli Soup with Smoky Chilly Crumbs · Olives Et Al
- Squash & Barley Salad · Olives Et Al
- Moroccan Chicken with Lemon & Olives · Olives Et Al

Wednesday 25 November 2015

Chamomile & Turmeric Evening Tea

Green Kitchen Stories » Chamomile & Turmeric Evening Tea

Brandied mincemeat filo purses.

Brandied mincemeat filo purses recipe - All recipes UK
Ingredients
Serves: 6
6 sheets filo pastry, 30 x 50 cm each, about 180 g in total
45 g unsalted butter, melted
1 tbsp icing sugar, sifted

Mincemeat filling
150 g mixed dried fruit, such as sultanas, raisins, currants and diced peel
4 tbsp brandy
1 cooking apple, about 250 g
30 g preserved stem ginger, finely chopped
25 g chopped walnuts
finely grated zest of 1 small lemon

Method
To make the filling, place the dried fruit in a bowl with the brandy and stir.
Cover and leave to soak for 1 hour or until the brandy has been absorbed.

Preheat the oven to 200°C (400°F, gas mark 6)
Peel, core and coarsely grate the apple.
Add to the soaked dried fruit together with the ginger, walnuts and lemon zest.
Mix well together.

Lay the sheets of filo out, stacking them on top of each other.
Cut the stack into six 15 cm squares, trimming off the excess pastry.
You will have 36 squares.
Brush each square very lightly with melted butter and layer them, with the corners offset, to make 12 stacks of 3 squares each.
Place about 1 tbsp of the fruit mixture on each stack, then gather up the edges and pinch together at the top to enclose the filling.
Place the pastries on a non-stick baking sheet and brush lightly with the remaining butter.
Bake for 12–15 minutes or until golden brown.
Serve warm, dusted with icing sugar.

Some more ideas:

Sunday 22 November 2015

Запеченная свиная лопатка.

Slow-roasted Pork Shoulder.

Ингредиенты:
1,8 - 2,2 кг свиная лопатка без костей, сухожилий и лишнего жира (верхняя часть лопатки, без кости)
Специи для свинины: базилик, розмарин, черный перец, мускатный орех и соль морская.
или:
1 столовая ложка семян укропа, прокалить
2 чайные ложки черного перца
1 столовая ложка сушеного тимьяна
2 столовые ложки свежих листьев розмарина
4 средних зубчика чеснока, измельчить
2 чайные ложки кошерной соли
Оливковое масло

4 средних яблока (cooking apples - яблоки подлежащие тепловой обработке)
1 средний желтый лук
0.5 чашки (120 мл) сухого белого вина (можно просто воды)

0.5 чайной ложки дижонской горчицы (для соуса)

Метод:
- Поместите семена укропа, перца, тимьяна и розмарина, чеснок и 2 чайные ложки соли в любой измельчитель (кофемолку, в ступке с пестиком) - размельчить.
Перемешать смесь с 2 столовыми ложками оливкового масла.

- Втереть смесь равномерно по куску свинины.
Если мясо связано, развязать его и натереть внутреннюю часть, и снова связать.
Обернуть мясо плотно в пищевую пленку и мариновать в течение ночи (или до двух дней).

- Разогреть духовку до 232°C.

- Очистить и порезать ​​яблоки на 4-6 долек.
Очистить лук. Порезать на примерно на 12 тонких долек.
Положить лук и яблоки в чугунную кастрюлю (Dutch oven - с крышкой), перемешать их с 2 столовыми ложками оливкового масла и приправить небольшим количеством соли и перца.
Сверху положить маринованное мясо свинины.

- Запекать в разогретой духовке в кастрюле без крышки в течение 30 минут (232°C).
Затем добавить вино и переключить духовку на более низкую температуру - 163°C.
Накрыть жаркое крышкой и медленно выпекать 2,5 - 3 часа, пока свинина не станет мягкой и вы сможете ее легко разделить вилкой на кусочки.

- Переложить мясо в блюдо и накрыть фольгой.

Соус:
Смешать яблоки и лук в блендере.
Добавить около 1/2 стакана воды (проверить густоту желаемого соуса по готовности и добавить больше по необходимости) и горчицы и сделать пюре, пропустить его через сито.
Проверить соус на соль и перец и исправить по вкусу.

Адаптированный рецепт от:
Slow-roasted Pork Shoulder | SimplyRecipes.com

Saturday 21 November 2015

Slow roast shoulder of pork.

- Easy Roasted Pork Shoulder - I Breathe... I'm Hungry...
Easy Roasted Pork Shoulder.
Spice rub:
2 Tbsp Salt
1 Tbsp pepper
1 Tbsp cumin
1 Tbsp onion powder
2 Tbsp garlic powder
1 Tbsp dried oregano

Combine all of the ingredients for your spice rub in a small bowl.
Remove pork shoulder (or other pork roast) from packaging and rinse under cold water.
Using your hands, pat the dry rub all over the surface of the meat.
Place in a large roasting pan skin side up.
Roast in a preheated 260 degree (C) oven for 20 minutes.
Reduce heat to 150C and roast for an additional 30 minutes per 0.500kg.
Total cooking time for an 3 kg roast should be about 4hrs and 20 minutes.
Remove the pork roast from the oven and let rest for 30 minutes.
The hard outer shell should lift right off like a cap and can be broken or chopped into delicious meat chips!
The meat should be tender enough to pull apart with forks.
Shred, adjust seasoning if necessary, and serve!

Pop the dish in the oven and roast for four hours, checking occasionally.
If the skin seems to be browning too quickly, turn it down to 250F/120C or cover with tin foil.
For the last hour make sure the meat has no covering.
If the crackling has not crackled, turn the oven up to 360F/180C for the last 30 mins.

...do not use aluminum foil when roasting.
Line a rimmed baking sheet with heavy duty aluminum foil (see note) and set a wire rack inside it.
Place a piece of parchment paper on top of the wire rack.

For an authentic Italian experience, accompany this rich, hearty roast with farro, the rustic, barleylike wheat. After hours of braising in a savory liquid, the pork becomes fall-off-the-bone tender — perfect for a comforting cold-weather meal. When it’s time to serve, scoop up the savory sauce with a slotted spoon to leave the fat behind.
------------
Pork Shoulder Braised in Milk

1 boneless pork shoulder, 3 1/2-4 lb. (1.75-2 kg.), trimmed of excess fat
Kosher salt and freshly ground pepper
3 Tbs. unsalted butter
1 Tbs. olive oil
25 fresh sage leaves, coarsely chopped
4 cups (32 fl. oz./1 l.) whole milk
1 cup (8 fl. oz./250 ml.) heavy cream
3 bay leaves
Zest from 1 lemon, removed in wide strips with a vegetable peeler
1 tsp. fresh lemon juice

Remove the pork shoulder from the refrigerator and let stand at room temperature for 1-1 1/2 hours.

Preheat the oven to 325°F (165°C).

Season the roast generously all over with salt and pepper. In a Dutch oven or other large, ovenproof pot over medium-high heat, melt 1 tablespoon of the butter with the oil. Add the pork, fat side down, and sear for 3-4 minutes. Repeat to brown all sides, about 15 minutes total. Adjust the heat level so that the meat sizzles actively but does not scorch. Transfer the pork to a platter and pour off the fat from the pan.

Return the pot to medium heat and melt the remaining 2 tablespoons butter. Add the sage leaves. Cook for 1 minute. Stirring constantly, slowly pour in the milk and cream. Return the pork to the pot, fat side up, and add the bay leaves, lemon zest and 1 teaspoon salt. Season generously with pepper. When the liquid begins to steam, partially cover the pot and transfer to the oven.

Cook the pork, turning it every 30 minutes, for 2 hours. Uncover and continue to cook until very tender, 30-60 more, again turning after 30 minutes if cooking for longer than 30 minutes more. Transfer the pork to a platter and let the pan sauce settle.

With a slotted spoon, remove the curds from the sauce, leaving behind the fat, and transfer to a fine-mesh sieve set over a small saucepan. Push the curds through the sieve to make a smooth, creamy sauce. Warm the sauce over low heat and stir in the lemon juice. Taste and adjust the seasoning. The sauce should be subtly tart from the lemon and slightly peppery, to cut the pork’s richness. Cut the pork into thick chunks and serve at once, passing the sauce at the table. Serves 6-8.
----------------
Slow roast shoulder of pork recipe - Telegraph:
3kg shoulder of pork on the bone (Tamworth; ask your butcher to score the skin)
4 fennel, quartered lengthways
1 bulb of garlic, peeled, whole
1kg of shallots, peeled, whole
1 sprig of fresh bay leaf
1 sprig of thyme
2kg of red potatoes, cut into 2cm thick pieces cross ways
1 bottle white wine
½ litre of water
METHOD
Preheat the oven to 300F /150C/Gas 2. An hour before cooking rub salt into the skin. Salt and pepper the underside of the meat.
In a baking dish large enough to hold your pork, scatter the vegetables, leaving the potatoes until last. Place the potatoes on top of the fennel. Place the seasoned shoulder on top of the vegetables, pour in the liquids, so the meat will steam a little as well as roast.
Pop the dish in the oven and roast for four hours, checking occasionally. If the skin seems to be browning too quickly, turn it down to 250F/120C or cover with tin foil. For the last hour make sure the meat has no covering. If the crackling has not crackled, turn the oven up to 360F/180C for the last 30 mins.
Carefully put the shoulder to the side and then decant all the vegetables to a platter. Skim off the excess fat in the dish into a jug to be used at another time. Carve the meat up as best you can into hunks on to a platter, heat the remaining juices, then pour over the shoulder.

OR:
- Taccozzette con Straccoto Recipe: Pasta with Braised Pork Shoulder Ragu | Shared Appetite:

- Slow-roasted Pork Shoulder | SimplyRecipes.com
450°F = 232°C
325°F = 163°C
'via Blog this'

Friday 20 November 2015

Red Rooibos Tea.

The 50 Healthiest Foods of All Time (With Recipes) | TIME
Rooibos.
The leaves are used to make a herbal tea called rooibos or bush tea (especially in Southern Africa) or sometimes redbush tea (especially in Great Britain).
In South Africa, it is common to prepare rooibos tea in the same manner as black tea and add milk and sugar to taste.
Other methods include a slice of lemon and using honey instead of sugar to sweeten.
Why it’s good for you: Rooibos (roy-bus) tea, a red tea packed with antioxidants that guard us from chronic and degenerative diseases alike, is rich in minerals like calcium and iron.
Health Benefits of Red Rooibos Tea | Organic Facts
Health benefits of red rooibos tea include its use as a cure for nagging headaches, insomnia, asthma, eczema, bone weakness, hypertension, allergies, and premature aging.
Why your rooibos tea might get much more expensive - CBS News
A trade council says an ongoing drought in South Africa will devastate the rooibos tea harvest, which may lead to a 90 percent price increase.
Red Bush Tea Company.

Чай ройбос.


Ройбос - кустарник, произрастающий в Африке, а также напиток (фиточай), получаемый настаиванием листьев и частиц ветвей этого кустарника в горячей воде.
Ройбос издавна используется для приготовления травяного чая, имеющего то же название.
Ройбос заваривается в обычном заварочном чайнике (фарфоровом, фаянсовом, глиняном).
Процесс заваривания ройбоса весьма прост — его нужно залить кипятком и выдержать не менее пяти минут.
Иногда рекомендуют для лучшей экстракции на время настаивания поместить чайник в горячую духовку, чтобы он не остывал или даже продолжал кипеть — в отличие от обычного чая, ройбос нормально переносит кипячение.
Для кипячения ройбоса целесоообразно использовать чайники из жаропрочного стекла, нагреваемые на электрической плите или газовой — через рассекатель.

Дозировка сухого ройбоса приблизительно соответствует дозировке чёрного чая — одна-две чайные ложки на чашку.
«Чаинки» ройбоса очень плотные, процесс экстракции содержащихся в них веществ достаточно длительный, поэтому ройбос вполне можно заваривать несколько раз, причём при повторных завариваниях напиток получается почти таким же насыщенным, как и при первом.

Tuesday 17 November 2015

Kale - iron-rich vegetable.

Kale recipes | Our 10 Best... | Life and style | The Guardian

Mellow Yellow Jerusalem Artichoke Pickle.

Taking the Wind Out of Jerusalem Artichokes | A Gardener's Table
700 gram Jerusalem artichokes, broken into nodes, thoroughly scrubbed, and cut into ½-inch dice
1 teaspoon ground dried turmeric
about 8 cloves garlic, chopped
14 gram fresh ginger, minced (about 1 ½ tablespoons)
1 teaspoon cumin seeds
2 teaspoons pickling salt
2 teaspoons sugar
1½ cups water

Toss together the diced Jerusalem artichokes, the turmeric, the garlic, the ginger, and the cumin. Pack the mixture into a jar with a capacity of at least 6 cups. Dissolve the salt and sugar in the water. Pour the brine over the Jerusalem artichokes; it will not cover them at first. Add a brine bag (a gallon freezer-weight plastic bag containing 1 tablespoon salt dissolved in 3 cups water) or another suitable weight.

The next day the brine should cover the Jerusalem artichokes. If it doesn’t, add more brine mixed in the same proportions.

Wait several days before tasting the pickle. I found it perfect after a week: The brine was sour, and the Jerusalem artichokes pleasantly, mildly spicy and still crunchy.

When the pickle has fermented enough to suit your taste, store the jar in the refrigerator. Keep the Jerusalem artichokes weighted so they won’t take on a grayish cast.

- To fart, or not to fart; that is the question! - The Idiot Gardener

The British Leafy Salad Association.

The British Leafy Salad Association web site

Monday 16 November 2015

Jerusalem Artichokes.

Anne's Food: Roasted Jerusalem Artichokes
Roasted Jerusalem Artichokes.

Peel the chokes and cut them into smaller pieces - halves if they're small, quartered lengthwise for larger.
Place in an oven-proof dish and drizzle with olive oil.
Sprinkle with a good pinch of sea salt and toss.
Roast at 175°C for 30-40 minutes (with garlic).

https://www.abelandcole.co.uk/recipes/jerusalem-artichoke-recipes
Carrot and Artichoke Soup
Jerusalem Artichoke Soup
Jerusalem Artichokes In Wine, Rosemary and Cream
Jerusalem Artichoke Mash
Jerusalem Artichoke and Carrot Salad
Jerusalem Artichokes In Butter and Garlic
Jerusalem Artichoke, Oyster Mushroom & Hazelnut Salad
Jerusalem Artichoke and Hazelnut Soup
Zesty Roasted Jerusalem Artichoke Salad

Monday 9 November 2015

Aubergine.

Steamed Aubergine | Vegetables Recipes | Jamie Oliver Recipes
Ingredients

2 medium purple aubergines
For the dressing
- 2 teaspoons sugar
- 4 tablespoons low-salt soy sauce
- 3 tablespoons sweet chilli dipping sauce
- 2 teaspoons sesame oil
- 1 lemon zest and juice of
- 4 spring onions, sliced
- 2 fresh red chillies, finely chopped
- 1 large handful fresh coriander, roughly sliced
- 1 large handful fresh basil, roughly sliced
- 1 large handful fresh mint, roughly sliced
- 1 large handful yellow celery leaves
- sea salt
- freshly ground black pepper

Method
This is a great way to cook aubergines, and probably one that not a lot of people would think of doing. To me, steamed aubergine sounds horrible but, believe me, this recipe is fantastic. Aubergines are usually fried or roasted, which makes them soak up loads of oil, but steaming means they go really soft and tender so that they're lighter to eat – which means you can eat a lot more! All round the world there are so many different varieties of aubergines – long, round, purple, green – so keep your eyes peeled and try cooking them all.

Put some water in a pan and bring it to the boil.
Slice the aubergines in half lengthways and place them in your steamer with the cut side facing up.
Steam them for about 10 minutes – to check whether they're ready, simply squeeze the sides gently and if they're silky soft then they're done.
Remove them from the steamer, place them in a colander and leave to cool.

Now make your dressing by mixing all the ingredients together.
When the aubergines are warm this is the perfect time to flavour them.
Cut them up into rough 2.5cm dice, then dress them and toss.
Serve immediately as a salad, tapas dish or as a vegetable next to any simple cooked fish.
Just really tasty!

Sunday 8 November 2015

Poultry Seasoning.

From the Spice Cupboard: Poultry Seasoning | The Kitchn
Poultry are domesticated birds.
Makes 1/4 cup

1 tablespoon ground sage
1 tablespoon ground thyme
1 tablespoon ground marjoram
1 teaspoon ground rosemary
1 teaspoon crushed celery seed
1 teaspoon ground black pepper

Saturday 7 November 2015

With Qυinces.

Beef With quinces
Veal Stew With quinces (Moshari me kidonia)
Vefa's Kitchen.
Page 408
-

More:
- On the Savory Side: 5 Quince Recipes | The Kitchn
- Slow-roast pork belly with quince - delicious. magazine
- Tunisian Lamb and Quince Stew Recipe - Chowhound

Мясо с айвой.

Баранина с чесноком и айвой "Джамиля" - stalic
На равномерно распределённую по дну широкой и невысокой кастрюли морковь выложим бараньи голяшки, разделанные «розочкой».
Зальём голяшки бульоном и разложим поверх них зубчики чеснока.
На восемь голяшек я взял четыре головки чеснока.
Поверх чеснока несколько веточек тимьяна, не забыть посолить и всё – закрываем крышкой да на самый маленький огонь!
Время варки может очень сильно варьироваться в зависимости от возраста баранины, но варить надо до тех пор, пока мясо не станет совершенно мягким, а жилки в тех местах, где мясо держится за кость, должны стать буквально прозрачными.
Когда и мясо приготовится, и чеснок станет таким, что его и вилкой не подцепишь – падает, - вот тогда самое время для второго этапа приготовления этого блюда.
Откройте крышку и уберите тимьян – всё, что мог, он уже отдал, его запахом уже пропитано мясо, его вкусом напоен бульон.
А вот айву – если хотите – порежьте и уложите ломтиками поверх мяса и чеснока.
Если бы я готовил блюдо, где вкус чеснока оставался бы в его первозданном виде, то айве здесь было бы не место.
Но теперь, когда чеснок стало принципиально иным, чеснок и айва не будут создавать дисгармонии, а айва рядом с тушёным мясом – достойное украшение блюда!
Давайте поставим кастрюлю без крышки в духовку, нагретую до 150-160С.
Пусть стоит, пока айва и мясо не зарумянятся и бульон не выпарится почти до конца.

- Говядина в темном пиве с айвой и клюквой
- Говядина, тушенная в пиве с айвой и клюквой | Кулинарные рецепты от «Едим дома!»

Friday 6 November 2015

Quince.

How To Cook Quince — Cooking Lessons from The Kitchn | The Kitchn


Quince membrillo.
A classic way to eat quince – a paste which is traditionally served with Manchego in Spain. It is easy to make and stores well. Eat it with cheese, on its own, or add a little to flavour casseroles and sauces.

Makes 2kg

granulated sugar (for exact quantity see below)
2kg quince (or quince and cooking apples if you are short of quince)
a little ground cinnamon
Put the packets or bowl of sugar in a very low oven to warm up for about half an hour.

Roughly chop the unpeeled quinces and put into a pan with 300ml water. Cover and stew gently until the fruit is soft. Sieve or mouli the fruit and measure then purée. For each 600ml of purée, add 350g of sugar. Gently heat in a deep saucepan until the sugar has completely dissolved. Raise the heat and bring to the boil, stirring continuously to prevent it catching. As it reduces, it will spit and splatter, so cover your hand with a cloth.

After about 45 minutes the mixture will have turned a lovely reddish brown and will begin to come away from the side of the pan as you stir. Pour into baking trays lined with non-stick paper or an oiled mold. Leave, uncovered, at room temperature for 2-3 days before cutting into blocks or chunks.
- Quince membrillo recipe | Sarah Raven

- Ingredient Spotlight: Quince | Williams-Sonoma Taste:
Homemade Quince Paste with Manchego Cheese.
Quince Teacake with Sweet Syrup.
Quince Poached in Vanilla Syrup.

- Quince recipes | Nigel Slater | Life and style | The Guardian:
Roast quinces
Pickled quinces

- Quince | SimplyRecipes.com
- Quince tarte Tatin Recipe - David Lebovitz
- Vanilla-Poached Quince Recipe - David Lebovitz
- Rosy Poached Quince - David Lebovitz
- Celeriac In Olive Oil With Quince and Orange - Gourmet Kitchen Tales

in Russian:
- айвовое варенье
- Не пропустите сезон варенья из айвы! - stalic

Tomato Recipes.

-Summer Fest: 20 Tomato Recipes - Pinch My Salt:
Tomato Tarte Tatin
Ingredients:
2 tablespoons butter
1 tablespoon brown sugar
2¾ pounds 2-inch tomatoes (or Roma tomatoes), halved and seeded
1 tablespoon balsamic vinegar
1 tablespoon choppedfresh oregano
Salt and pepper, to taste
Pie pastry for a 12-inch tart
Extra sprigs fresh oregano (for garnish)

A peperonata.

A peperonata recipe straight from Rome | Kitchen sink tales | Life and style | The Guardian
by Rachel Roddy.

Serves 8
1kg red peppers
4 tbsp extra virgin olive oil
A small knob of butter
1 large onion, peeled and finely sliced
1 clove garlic, peeled and pressed
Salt, to taste
450g peeled plum tomatoes (or fresh when in season)
Red wine vinegar, to taste (optional)

1 Cut the peppers into strips, about 1cm wide and 6cm long, discarding the seeds, stalks and any pithy white bits.

2 In a heavy-based pan with a lid, warm the olive oil and butter over a medium-low heat, then cook the onion and garlic until soft, translucent and fragrant (they should not brown), which usually takes about 10 minutes. Add the peppers and a pinch of salt, stir, then cover and simmer for 15 minutes, stirring every now and then.

3 Add the tomatoes, stir and then leave, uncovered, at a lively simmer for 30-40 minutes. Stir occasionally, gently pressing the tomatoes against the side of the pan, so they break up.

4 The peperonata is ready when the peppers are soft and everything has come together into a thick stew (it shouldn’t be sloppy). Taste, season generously, and add a dash of vinegar to sharpen things up, should you want to.


More by Rachel Roddy: Rachel Roddy | The Guardian

Peperonata.

Peperonata from "Divina Cucina" blog.
Or Tuscan Bell Pepper-Red Onion Stew.
Notes:
For the pureed tomatoes, you can use a puree of fresh peeled and seeded tomatoes that have been briefly cooked to concentrate their flavor, or canned whole tomatoes that you've blended with their juices. (Canned tomatoes are often the better choice, since they are usually top-quality.)
If you make this with beautiful, ripe summer bell peppers, they should provide enough sweetness to balance the small amount of vinegar.
If your peppers are less sweet and the peperonata tastes a little too tart, add a tiny bit of sugar, a pinch at a time, until the flavor is balanced.

Don't brown the onion, just let it soften to a pale golden colour.
The texture of the peppers and onions should be silky and soft enough to crush between your fingers.
The stew will mellow when left in the fridge for a day or two.

4 large bell peppers, cut into 1 inch strips
4 large red onions, peeled and cut in half and into slices
olive oil
salt
2 Tbs sugar
2 Tbs red or white wine vinegar.
4 Tbs capers

Drizzle a little olive oil in a large skillet.
Add the peppers and onions.
Sprinkle with salt (this will bring the liquid out of the veggies.)
Cover and let cook until the peppers and onions have become soft.
Add the sugar and vinegar.
Turn up the heat and caramelize the vegetables.
Taste for the correct balance of sweet and sour.
I use regular white sugar and wine vinegar.
Add the capers, stir and turn off the heat.
This is great hot, but best the next day at room temperature.

More recipe and a word of caution:
- Skillet Steak Peperonata Recipe | Leite's Culinaria
A word of caution:
Don’t use green bell peppers in this peperonata.
We know, some of you love your green bell peppers.
And that’s very nice for you.
But red, yellow, and orange bell peppers have a distinctly different flavor profile, one whose sweet notes meld marvelously with the other ingredients here.
The rather unique smack of green bell peppers? Not so much. Trust us.

- Peperonata (Sweet Bell Peppers With Olive Oil, Onion, and Tomatoes) | Serious Eats
Notes:
For the pureed tomatoes, you can use a puree of fresh peeled and seeded tomatoes that have been briefly cooked to concentrate their flavor, or canned whole tomatoes that you've blended with their juices. (Canned tomatoes are often the better choice, since they are usually top-quality.)
If you make this with beautiful, ripe summer bell peppers, they should provide enough sweetness to balance the small amount of vinegar.
If your peppers are less sweet and the peperonata tastes a little too tart, add a tiny bit of sugar, a pinch at a time, until the flavor is balanced.

- Peperoni in padella (Angelina's Fried Peppers) | Memorie di Angelina
Take it from Angelina:
Don’t be shy with the oil.
You need to use a lot of oil to get the right flavor and consistency for this dish.
Make sure that all the vegetables glisten; if not, add more oil.
And use olive oil—no other oil will do.
You can remove the excess before serving if you want a lighter dish.
Many recipes for fried peppers call for adding a bit of fresh tomato or tomato purée. I’m not partial to either of these variations, but that’s a matter of personal preference.
Whatever other ingredients you decide to add to your fried peppers, be sure that you cook the peppers until they are actually done.
The Italian way with vegetables is to cook them until they are completely tender—not crisp-tender as in Asian stir-fry or trendy North American cooking.
This is particularly important for peppers; they have a completely different taste when they are raw, which some people have described (charitably if you ask me) as ‘tangy’.

- Nigel Slater's classic peperonata recipe | Life and style | The Guardian
The trick
The peppers must be sweet and ripe.
Don't brown the onion, just let it soften to a pale golden colour.
The texture of the peppers and onions should be silky and soft enough to crush between your fingers.
The stew will mellow when left in the fridge for a day or two.
The twist
I'm not sure I'd risk incurring the late Mrs David's wrath by introducing any twists, but it is worth noting its uses beyond that of an antipasto.
I have served it on both soft and toasted polenta, used it as a pasta sauce and even stirred cooked penne through it before baking it with a few slices of mozzarella on top.
Drained of its liquid, this recipe makes a splendid stuffing for sourdough sandwiches.
You could ring the changes with tarragon instead of the basil or even coriander leaves, as long as you don't call it peperonata.
I have used the last dregs from a dish as a pizza topping with surprising success.

- Peperonata | Williams-Sonoma
'via Blog this'

kale and caramelized onion stuffing.

kale and caramelized onion stuffing | smitten kitchen

Wednesday 4 November 2015

Sourdough bread.

Apple Sourdough Bread Starter - Recipe by Kirsten Dixon:
Apple Sourdough Bread Starter
Author: Kirsten Dixon
Recipe type: Bread

To make your own sourdough bread starter, begin with good ingredients.
Some people use non-chlorinated, purified or distilled water and only organic flour so there aren’t any chemicals or pesticides that would inhibit lactobacillus growth.
It’s a personal choice to take those extra steps but since you are creating a starter batch that will be around for a long time, why not make it as pure as possible?
INGREDIENTS
2 Granny Smith (or other) tart green apples
6 tablespoons sugar
3 cups water
2½ cups all-purpose flour
INSTRUCTIONS
Cut up the apples into chunks and place in a bowl (I leave the skin on but you can peel the apple if you prefer), add in the sugar and ½ cup of the water.
Cover the bowl.
Let it sit for about a week in a warm place in the kitchen, checking on it now and then.
If for some reason the apple has dried out, add in a little more water.
The apple will soften and turn into something that looks like applesauce.
Make sure your sourdough container is well washed.
Add in the flour, the remaining water, and the apple mash.
That’s it.
Set the covered starter in a warm place and now you have a living pet that has to be fed and watered, sometimes every day.
To maintain your sourdough, the general rule is to add in equal weight amounts of flour and water (roughly 1 cup flour and ½ cup water) as you use the sourdough.
If you don’t bake enough to use sourdough every week, then you’ll need to add in, or “feed” the starter with additional flour and water.
You might have to remove a little bit of the old starter to add in new flour and water so you don’t outgrow your container.
If you don’t use your sourdough for an extended period of time, place it into the refrigerator or freezer until ready to reactivate.
NOTES
Makes about 4 cups of starter.

Related Recipes:

- Best-selling author William Alexander: Levain, sourdough, starter...call it want you want — it is the secret to authentic, yeasty, artisan bread. certainly read!

- Basic sourdough bread | LITTLE SCANDINAVIAN:

- Links | Northwest Sourdough - Sourdough Bread Baking Courses:

- Bread Experience bread baking blog:

- New Nordic Cuisine | New Scandinavian Cooking:

Warm spiced cauliflower and chickpea salad with pomegranate seeds.

Simply Nigella Cookbook | Williams-Sonoma Taste

Ingredients
3 tbsp regular olive oil
½ tsp ground cinnamon
2 tsp cumin seeds
1 small head cauliflower, trimmed and divided into small florets
250g/9oz home-cooked chickpeas (drained weight) or a 400g tin chickpeas
1–2 tbsp harissa, to taste
4 small ripe vine tomatoes (approximately 150g/5½oz), quartered
1 tsp sea salt flakes, or to taste
3–4 tbsp pomegranate seeds
large bunch (approximately 100g/3½oz) flatleaf parsley

Preparation method
Preheat the oven to 220C/200C Fan/Gas 7.
Pour the oil into a large bowl, add the cinnamon and cumin seeds, and stir.
Tip in the cauliflower and toss to coat.
Pour into a small oven tray (I mostly use a disposable foil baking tray measuring 30x20cm/12x8in) and place in the oven for 15 minutes.
Don’t wash out the bowl you’ve been using.
Add the chickpeas to the bowl, and add the harissa, tasting it first to see if you want both tablespoonfuls.
Toss to coat.
Add the tomatoes to the bowl, and stir to mix.
Remove the cauliflower and quickly tip the chickpeas and tomatoes over the cauliflower.
Toss to combine and return to the oven for 15 minutes, or until the cauliflower is tender.
Remove from the oven and sprinkle the salt over the vegetables, add half of the pomegranate seeds and toss to combine. Divide between 2 bowls.
Divide the parsley leaves – without chopping them – between the 2 bowls and toss to mix.
Scatter with the remaining pomegranate seeds and serve.

How to Make the Best Pie Crust and Apple Pie.

- Slideshow: Step-by-Step: How to Make the Best Pie Crust: Serious Eats | Serious Eats
- Slideshow: Step-by-Step: How to Make a Perfect Apple Pie: Serious Eats | Serious Eats
- Step-by-Step: How to Make a Perfect Apple Pie | Serious Eats

Tuesday 3 November 2015

Membrillo (Quince Paste).

- Easy quince cheese recipe (membrillo) | The Cottage Smallholder
- Membrillo (Quince Paste) Recipe | SimplyRecipes.com
- Membrillo
- Got Quince? Make Quince Paste! (Membrillo) — The Cheesemonger | The Kitchn
Membrillo (Quince Paste).
Method

Chop the quinces – there’s no need to peel or core them, but make sure the fur you sometimes find on their skin is washed off – and put them in a large saucepan with just enough water to cover.
Simmer gently for 30 minutes or until the flesh is really soft and collapsing.
Push the mixture through a sieve with the back of a wooden spoon, then measure the purée – there should be just under 1 litre.
Put the purée back in the pan with 450g sugar for every 600ml of purée.
Heat gently, stirring from time to time to help the sugar dissolve, then bring to the boil and cook gently for 30–40 minutes or until the mixture is so thick that if you scrape a wooden spoon through it, the purée parts and leaves a clean line at the bottom of the pan.
You need to stir frequently and get well into the edges of the pan to make sure you don’t leave bits that could stick and burn, and be careful not to get splashed by hot, bursting bubbles of purée.
Spread the mixture into lightly oiled dishes or moulds, or pot in clean, sterilised jars.
The membrillo will set firm as it cools and will keep for up to 6 months in the fridge.

Quince Membrillo is equally lovely, but I also like to make a jelly, which I store in little jars.
Quince jelly
Summary:
This is very easy to make.
If you haven’t a jelly bag, line a colander with a large piece of muslin standing over a bowl to catch the juice.
Serve the jelly with lamb and game dishes or just with toast and butter.
Quince Cydonia japonica belong to the same family as apples and pears (Rosaceae), the shape resembling either one.
Quinces are hard and cannot be eaten raw but they have a wonderful, fragrant flavour when cooked.
The seeds contain a high proportion of pectin so quinces make excellent jellies as do the ornamental fruit of Chaenomeles.
To me the smaller fruits of Chaenomeles are often more likely to be in the garden waiting to be put to some use in the kitchen.
Wedges of peeled quince give depth of flavour to an apple pie or crumble.
Ingredients:
1/2 kg sugar
1/2 litre (1 pint) quince liquid pulp
Details:
Achieving the perfect results
Wipe the fruit, cut it up roughly but do not core or peel.
Put the chopped fruit in a pan, barely cover with water and simmer until soft and pulpy.
Strain through a jelly bag overnight.
Measure the liquid, for every pint add 500g granulated or caster sugar.
Add the sugar to the pan with the strained liquid and over a gently heat, stir until the sugar is dissolved. Once dissolved boil for 10 minutes.
Test for setting by spooning a little on a plate, cool for a few minutes push your finger through the jelly and if it wrinkles it is ready for setting.
The colour should be a glorious pink.
Pour into sterilized jar, seal and label.

Monday 2 November 2015

Popular Date Varieties.


Three main types of dates are grown:
Soft dates are mostly eaten fresh, are mild in flavor, with lower sugar content.
They're more common in the Middle East, though other world areas import them during Ramadan.
Hard dates are dry and fibrous even when fresh, hence the nicknames of "camel" dates or "bread" dates.
Drying intensifies their hard consistency and also their sweetness, and they'll last for years.
Nomads relied on these dates as staples, often grinding them into flour. Today, trekkers pack these firm dates as survival snacks.
Semi-dry dates are what most Westerners enjoy. They're aromatic, softer and chewier, with a pleasant level of sweetness.

There are thousands of named date varieties.
They fall into two main categories, soft and dry, and are most readily available from fall through winter.
The succulence of freshly picked dates will astonish anyone who has never tasted one before.